Administrator's Guide (v 1.4)
Content
Compatibility
Installation
Installing the Plugin
The plugin is available at the Atlassian Plugin Repository. To install the plugin, log in as system administrator and navigate to the global administration (Browse > Confluence Admin). Enter the Plugins section and navigate to the "Install"-Tab". Search for "User Profile Plugin" and press "Install".
If the installation was successful, a new item should appear on the left panel in the "Administration" section: "User Profile Configuration". This where the customization of the user profiles takes place. If this link is not visible, please ensure that all required modules of the plugin are enabled. You can do this by clicking "Plugins" in the global administration and selecting the "User Profile Plugin". Of the listed modules only the modules named "profile" are not required for the plugin to work. Each other module should be enabled.
Exchanging the Profile Macro
The profile-Macro (which is a part of the bundled plugin "Profile Macros") is required to display user data at the people directory, the hover for each user and at the personal space. The User Profile Plugin provides its own version of this macro. This version behaves like the one from "Profile Macros" but displays additional created user profile elements too.
If you want to exchange the macros you have to apply the following customizations in the given order:
- Open the alternative plugin view via "http://<server base url>/admin/viewplugins.action"
- Select the "Profile Macros" plugin
- Deactivate the original "profile" macro from the Profile Macros:
- click "Disable" on the module "profile"
- Select the "User Profile Plugin"
- Activate bothmacros with name "profile":
- click "Enable" on the modules "profile"
Licensing
Without an installed license the plugin runs in trial mode. This means you can only synchronize 10 users against your external directories. Furthermore, you can only create one additional field via the "User Profile Configuration".
A purchased license stays valid for one year. During that period you are entitled to support for your plugin. After the year you can continue to use the plugin but it is no longer supported and falls back into trial mode. You than have the option to purchase a renewal license which is less expensive than a full one. Each renewal license extends the validity of your plugin for another year.
If you contact us directly you have the possibility to get an evaluation license. This license provides full plugin functionality for a short period of time.
To purchase a license and provide it for the plugin please carry out the following instructions:
- Go to the license settings page (Global Administration > Plugins > "Manage Existing" Tab > User Profile Plugin > Configure Plugin).
- Decide for the kind of license you want to purchase: full or renewal
- A renewal license can only be applied if a full license was installed previously
- Click on the link that leads to your desired kind of license or directly navigate to the ShareIT Websites for the full or renewal license
- Decide for how many users you have to purchase the license and choose the specific product.
- This has to match the amount of users you purchased your Confluence license for (provided that license is still valid)!
- Follow the instructions of the shop
- At the last step ("Review Your Data") you have to provide the Server ID of your Confluence installation (section "Additional Ordering Information"). You can find the ID on the license settings page at the section "Product Information".
- After you finished the ordering process, you will receive an e-mail with the license key.
- Enter this license key (using copy & paste) into the text area below the section "License Key" on the license settings page and click on "Store License Key".
- After that you should see the period of validity for your license.
Configuration of user profile elements
You can access the configuration via the menu item "User Profile Configuration" in the panel on the left side of the administration section (Browse > Confluence Admin).
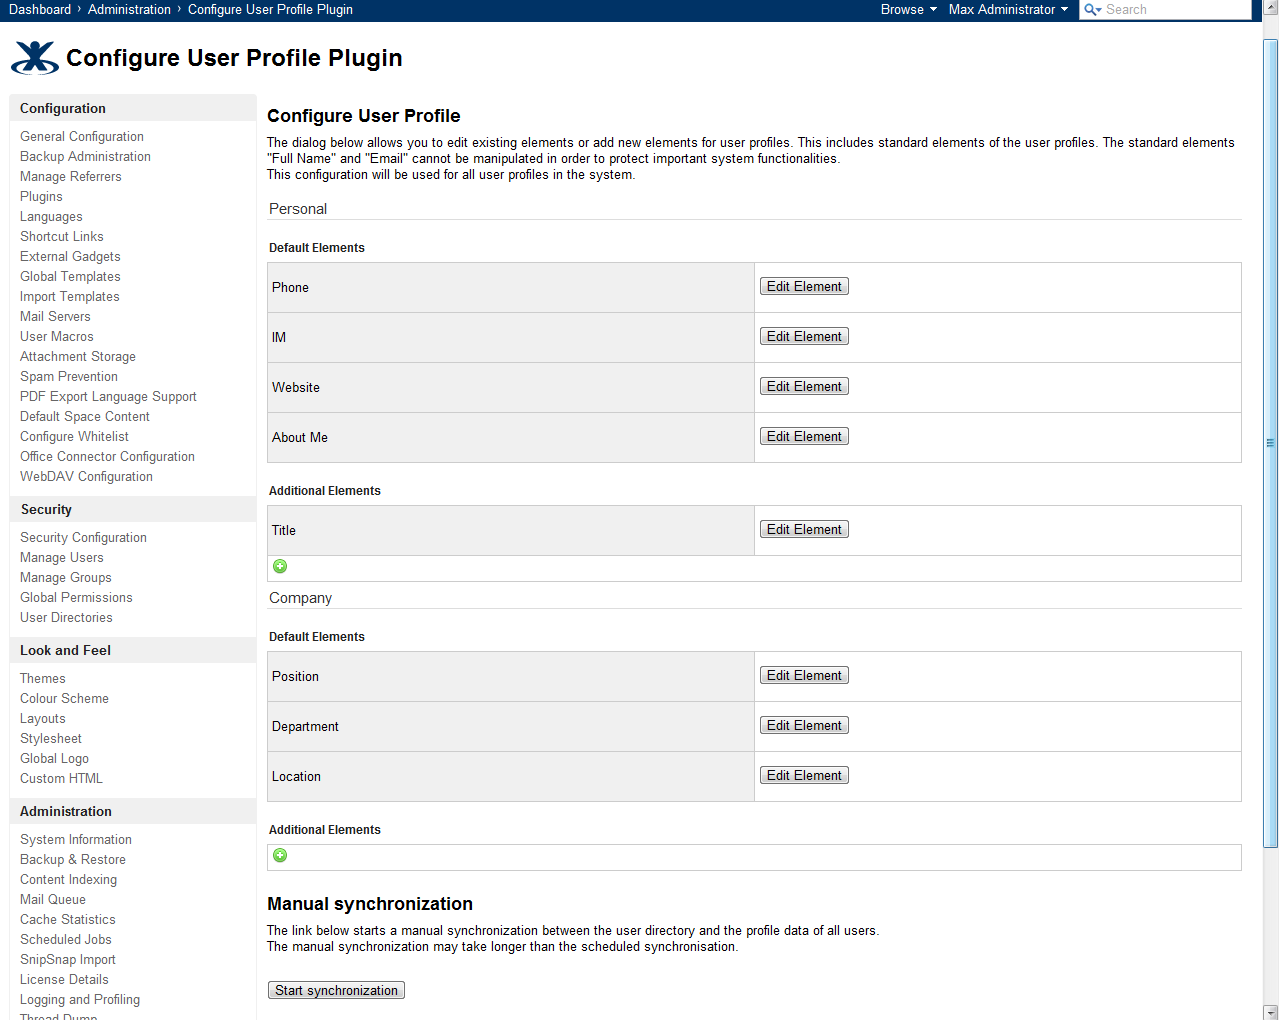
The configuration page allows you to add new elements for user profiles or to edit existing elements. This includes standard elements of the user profiles. The standard elements "Full Name" and "Email" cannot be manipulated in order to protect important system functionalities. Additional elements are placed at the end of the sections Personal and Company.
This configuration will be used for all user profiles in the system.
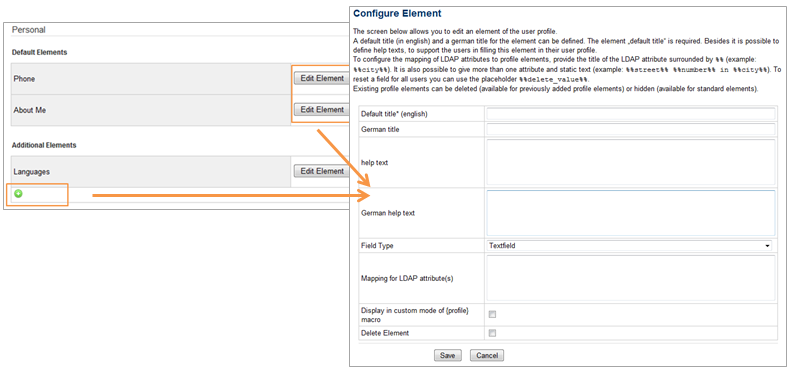
The configuration page of an element allows you to edit an element of the user profile.
- A default title (in English) and a German title for the element can be defined. The information for "Default Title" is mandatory. Additionally you can to define help texts, to support the users in filling this element in their user profile.
- The Default and German Title can only be edited for additional profile elements and not for standard elements.
- The "Field Type" of the element determines the kind of the element: You can choose "Text field" or "Text area". The latter is convenient for elements which might carry longer texts (like the "About Me" element) since it renders wiki markup too.
- For the synchronization to work, you have to provide a mapping of LDAP attributes to standard or additional user profile elements. It is possible to relate more than one LDAP attribute to one user profile element. The mapping has to be provided at "Mapping for LDAP Attribute(s)" by using the following syntax:
- Any LDAP attribute has to be given as %%LDAP attribute%% (i.e. name of an LDAP attribute enclosed in %%).
- You can also specify static text (e.g. %%street%% %%number%% in %%city%%)
- Use %%delete_value%% as a placeholder to delete the data for a synchronized profile element.
- The check box "Display in custom mode of {profile} macro" defines if the element will be shown in user profiles displayed by
{profile:style=custom}- This only works if the profile-Macro had been exchanged, see above
- Existing profile elements can be deleted (available for additional added user profile elements via check box "Delete Element") or hidden (available for standard elements via check box "Hide Element").
- The data for hidden elements stays stored as long as the check box "Hide Element" is active and is displayed again after it is unchecked.
- When a previously added profile element is deleted, all the data belonging to this element is purged as well for each user.
- Hiding standard profile elements only works if the profile-Macro had been exchanged, see above
Additional Notes
- Users cannot edit synchronized profile elements. An element is considered "synchronized", if the field "Mapping for LDAP Attribute(s)" in the customization form is not empty, even if the value of the mapped LDAP attribute is empty. This restriction only applies to users who are synchronized via LDAP. Local users can edit each profile element.
- Unknown LDAP attributes are recognized during synchronization and will be ignored. They are listed after each manual synchronization and produce a warning in the logs.
For the data of the user profiles to be updated, a synchronization has to run first. See the next section on how this can be achieved. - Though supported, it's not recommended not to create more than 15 to 20 additional user profile elements.
![]() Demo of user profile configuration
Demo of user profile configuration
Synchronization
There are 3 ways a synchronization can happen: Periodical or manual for all users (full synchronization) or at login for a single user. During this process the data of a users profile elements is updated with the values from the LDAP repository according to the mapping that was defined during configuration.
Manual Synchronization
The manual synchronization can be called from the configuration menu (there is a link at the bottom of the page). After clicking this link a full synchronization will happen. This means that the profile for every user will be synchronized according to your configuration. After the synchronization a short summary will be shown.
As a full synchronization is a resource consuming task, it should not be started during business hours.
Periodical Synchronization
A full synchronization will be executed periodically. The plugin is configured to start this synchronization by default at 1:11 a.m. each night.
You can customize or disable periodical synchronization via "Scheduled Jobs" in the administration. Look for the entry "External User Directory Sync Job" to configure the job that schedules periodical synchronizations.
Single-User Synchronization
Whenever a user logs in its profile data is synchronized with the user repository. Note that the synchronization will only run for that single user.
![]() Demo of synchronization:
Demo of synchronization:
All Versions