Manage Metadata in Spaces (v 3.3)
- Former user (Deleted)
- Duy N.
- Enrico Kutscher
For the following steps, you need Space Administrator permissions.
Introduction
Page metadata consists of metadata sets and fields. The metadata sets group several metadata fields together, usually according to a specific topic. E.g. the metadata set "Content" might contain the metadata fields "Author", "Date created" and "Date last changed".
Metadata sets may be global (available in all Confluence spaces) or space sets (available in one Confluence space only). This section describes how to create metadata in a single space (so-called "space metadata") and how to add it to pages. Please refer to the page Manage Global Metadata (v 3.3) for information on how to create and manage global metadata.
Create Metadata in a Space and Add it to a Page
In order to create and add metadata to a page, you need to be a Space Administrator. You first have to create at least one metadata field and then add the field(s) to a metadata set. Finally, assign at least one metadata set to a page. Please refer to the following documentation for detailed instructions.
The following steps are described on this page:
Create a Metadata Field
As a space administrator, go to the space you want to add metadata to and click "Space tools" on the bottom left. Then click the entry "Metadata". You will now see the following overview:
 Image 1: Space Administration - Metadata Overview (click to enlarge)
Click "Add Metadata Field" on the right. This will lead you to the configuration screen for metadata fields.
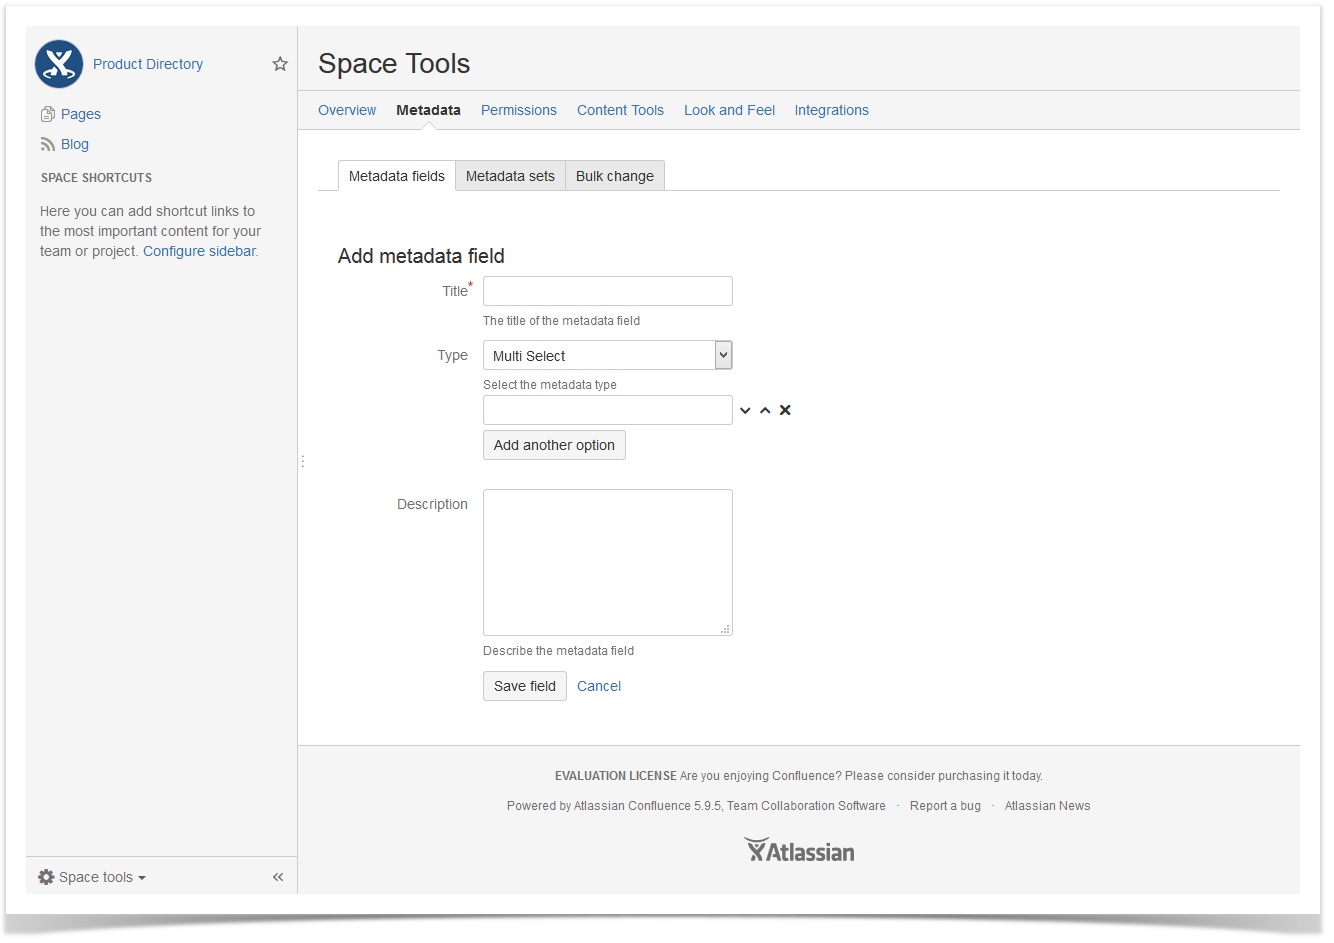 Image 2: Add Metadata Field (click to enlarge)
You can now enter a title, choose a field type and enter a description for the field. The title is mandatory.
Best Practice
- We recommend using only letters and numbers in field titles as well as multi select/single select options. Special characters like ], [, &, /, : and ? are known to conflict with CQL filters. CQL filters may be used for Confluence search and in Metadata Overview macros.
- Do not start field names or space names with a number however, there is a bug in the CQL search which leads to an error when searching/with the macros otherwise.
- Before creating a new multi select/single select field, make sure that you'll want to use the available field values long term. If you rename the values after creation, you will need to update any metadata macro where the changed value has been set manually.
- For space metadata: Make sure you're using distinct field names upon creation. If you don't want to work with the distinct name, you can rename the field afterwards. Example: You need a field "Project". The title is generic, so it's likely this name has been or will be reused in a different space at some point. Solution: Create the field as "Project SPACEKEY", thereby generating a distinct field key. Afterwards you can rename the field to "Project" if you prefer the short title. The field key will stay the same. This avoids trouble with the CQL search and therefore, the Metadata macros. We're already tracking this as a feature of a future release: METADATA-676 - Getting issue details... STATUS
Fields can have the following type:
- Multi Select
- Date
- Single Select (Dropdown)
- Group
- Link (add one or more links)
- Single Select (Radio Buttons)
- Text
- User
If User Profiles for Confluence >= 2.1 is installed, you can add existing single- and multi-select user profile elements for metadata fields. Please find more details here: User Profiles and Metadata Integration
Field Type User
SINCE VERSION 3.2.0
You you choose between two modes: Multiple users and One user. The mode determines how many users can be entered into the user field.
User fields that existed prior to version 3.2.0 will be understood as Multiple user fields. If the mode "Multiple users" is selected, it cannot be changed to "One user". This is to prevent data loss.
Field Type Link
When choosing the field type "link", you can restrict which internal links can be selected by the users with the help of a filter. Filters are defined according to the Lucene search syntax. Find further help on advanced Confluence searching here and here.
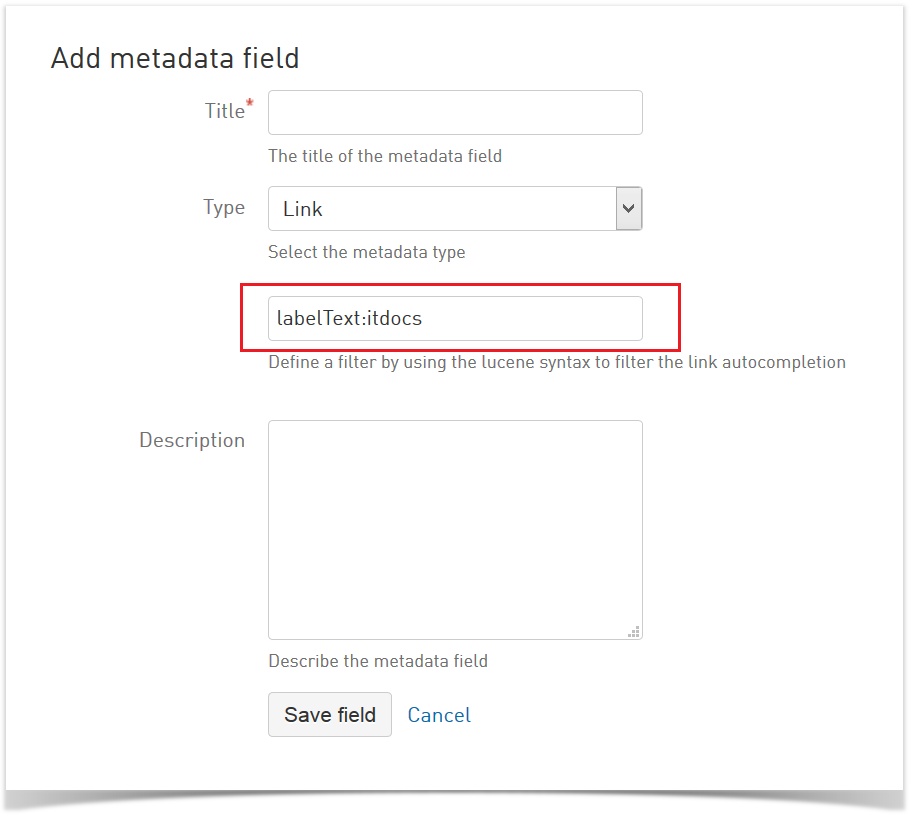 Image 3: Restrict Internal Links (click to enlarge)
Add Metadata Fields to a Metadata Set
The tab "Metadata Sets" is right next to the tab "Metadata Fields" (see screenshot). After opening the tab, click "Add metadata set" on the right to create a new set. This will lead you to the following form:
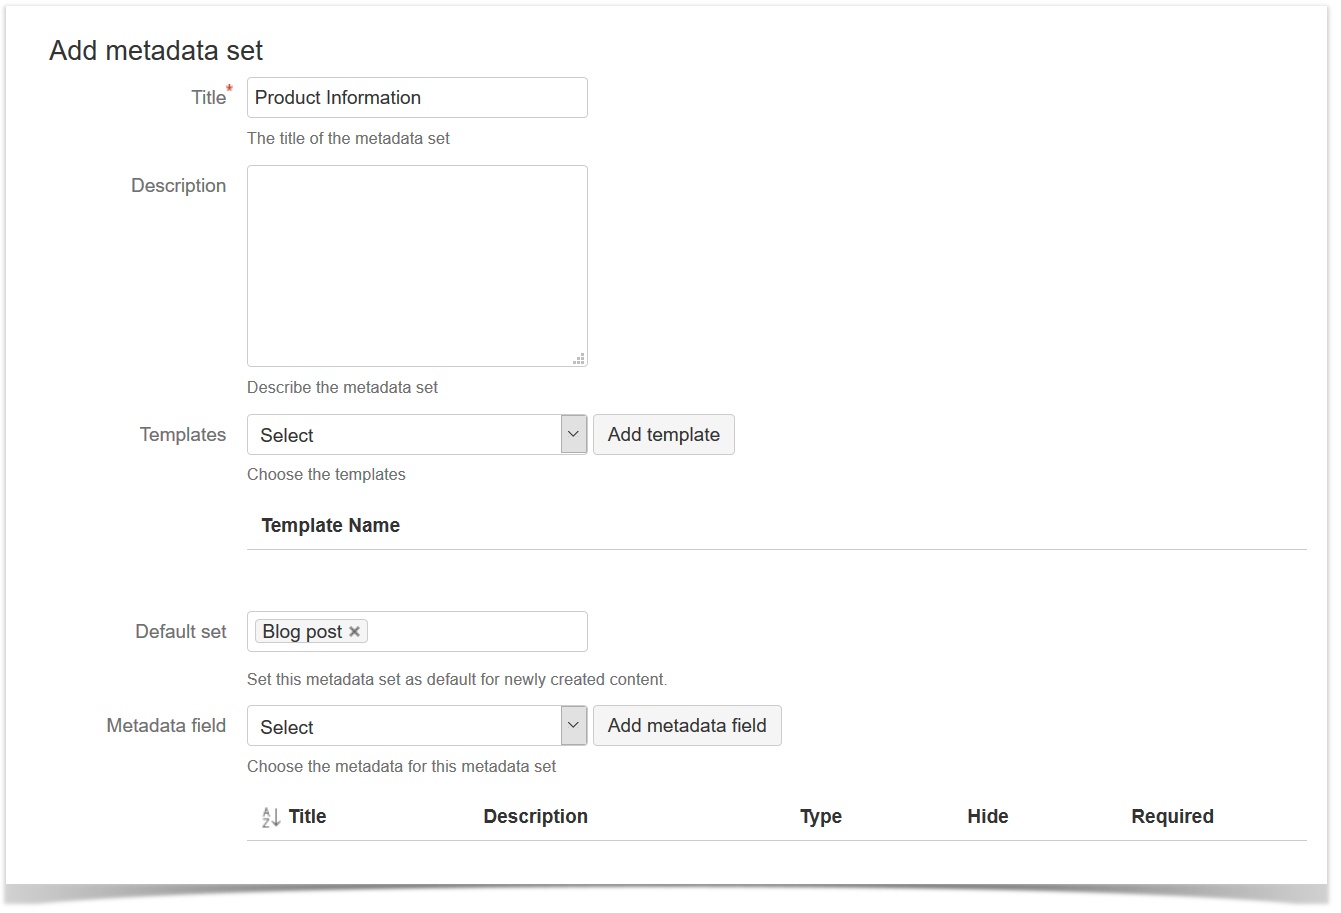
Image 4: Creating a Metadata Set (click to enlarge)
You can enter a title (mandatory), a description and select Confluence templates you want to add this set to (for more information on this option, see section Via Templates below).
SINCE VERSION 3.0
By entering "Page" and/or "Blog post" for the Default Set option, you can define whether this metadata set will be automatically assigned to
- all newly created pages in the current space and/or
- all newly created blog posts in the current space
Finally, you can select which already created metadata fields you want to add to this set. You can add space metadata fields as well as global metadata fields. Choose the respective field from the "Metadata Field" dropdown menu, click "Add Metadata Field" and repeat these steps until you have added all desired fields.
SINCE VERSION 3.0
Once you have added several fields to a set, you can change the order of the fields via drag & drop. To drag, click on the symbol at the start of each row.
If you click the sort symbol at the top left, the order is reset to alphabetical order.
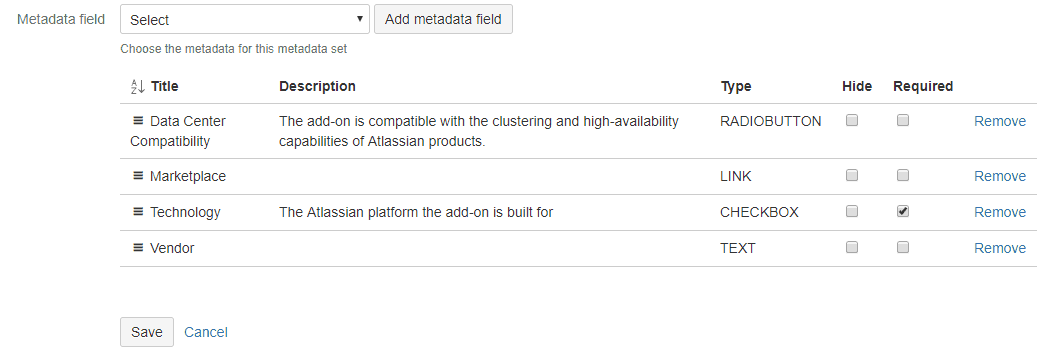
Image 5: Order Metadata Fields via Drag & Drop (click to enlarge)
Once a metadata field has been added to at least one set, you have to remove it from all sets before you can edit/delete it again.
Define Default Values
SINCE VERSION 3.3
After having added a metadata field to a metadata set, you can define defaults for each metadata field of the set.
Defaults are values which are prefilled for a metadata field if you create a new page or add a set for the first time to a page. They aren't fixed - which means you are able to select any other value for the particular metadata field.
To add a default value to any metadata field simply edit the Metadata set(s) the field belongs in. Click on pencil symbol if you want to add or edit a default or click on the trash symbol to delete it. You can add these defaults to metadata fields belonging to a set which is already associated with a template.
You always need to save the whole set to change or add your defaults.
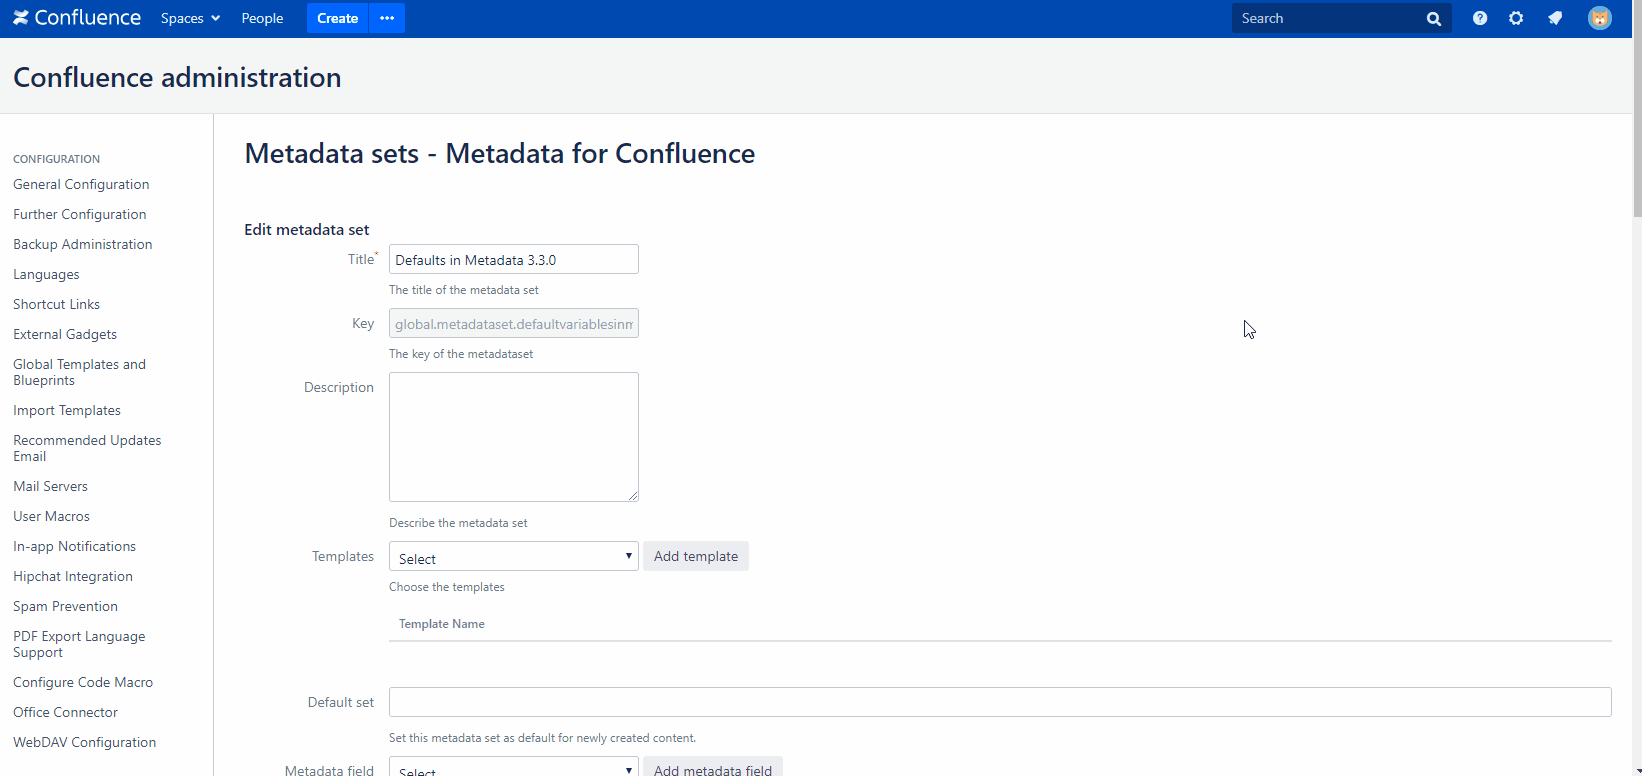
Image 6: Add a default value to a single select field (click to enlarge)
Default values of the metadata fields USER and DATE have special properties.
It is possible to define any specific user as a default value or to select "Set creating User". You can also mix those options. If the option "Set creating User" is used, the currently logged in user who is adding the set to a page or creating the page is automatically set as a user in this field.
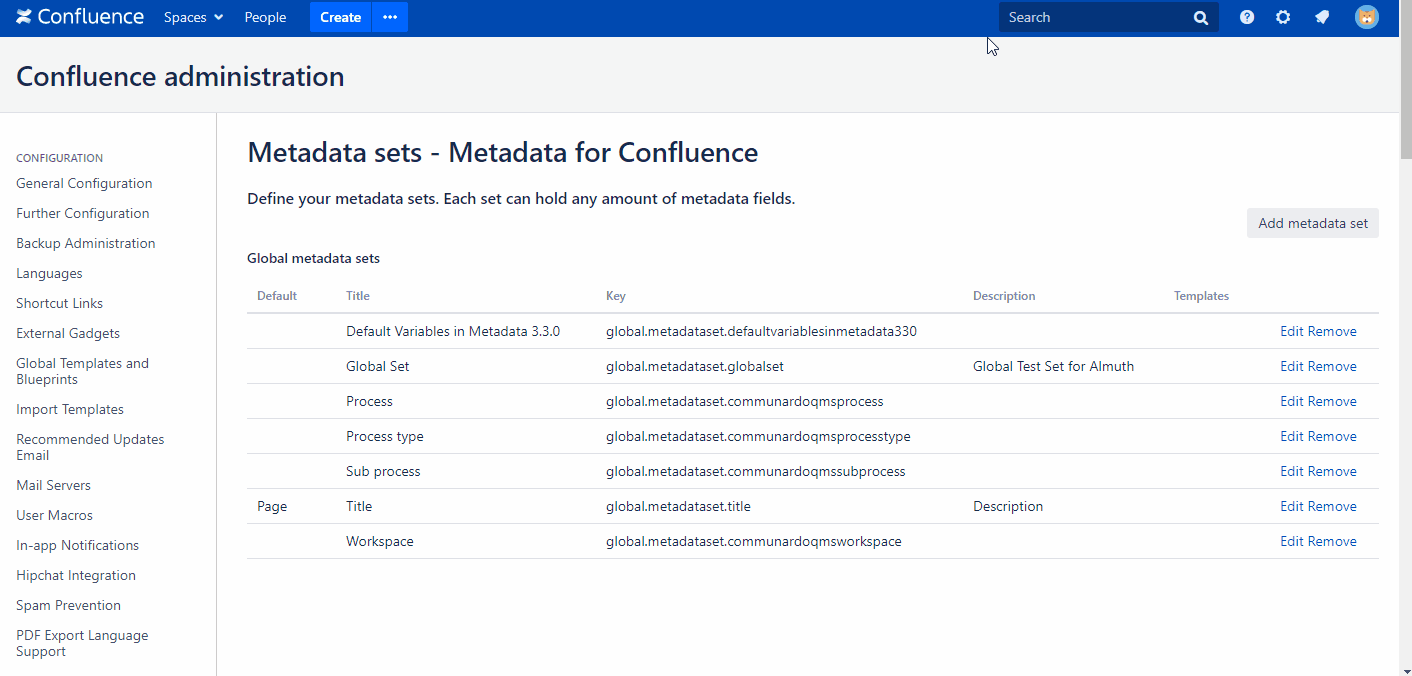
Image 7: Add a variable for the creating user to a metadata field (click to enlarge)
You can define any date as the default for the DATE type or select " Set creating Date". Using any date as default the metadata field is fixed without changing it manually, whereas using "Set creating Date" will select the date of creating a page/adding a metadata set for the first time to a page as a default. With the option "add time offset" it is possible to add a set number of days, weeks or months to the default value. This might be helpful for predefined time intervals like reviews of contracts and certifications.
Image 8: Add a variable for setting a date and add an offset to the date (click to enlarge)
Options: Hide and Required
After you have selected a metadata field to add to the set and clicked "Add Metadata Field", it will be added to the overview at the bottom of the page. In that overview, you can check "Hide" or "Required" for every field that has been added.
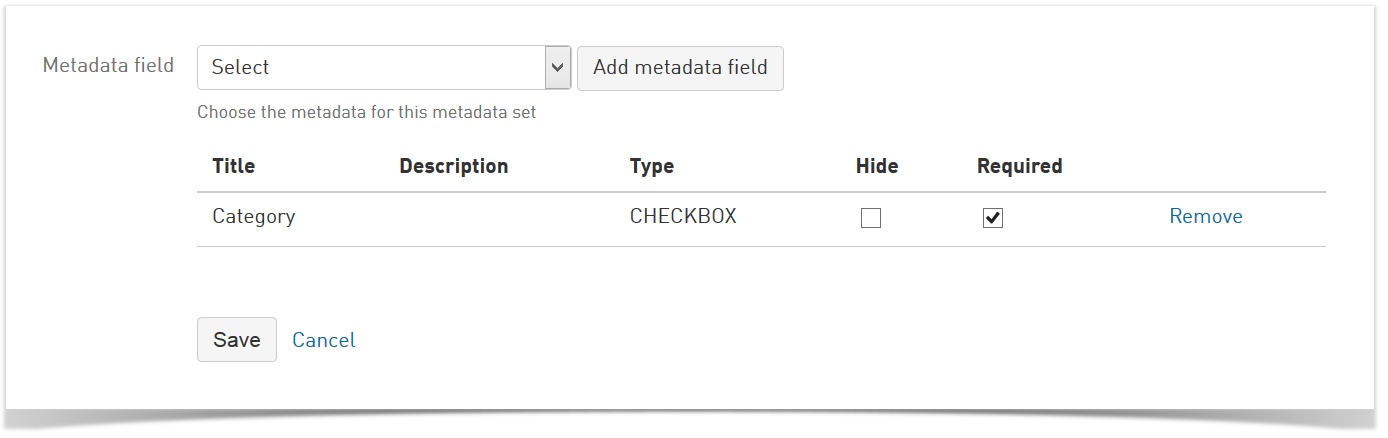 Image 9: Options Hide and Required (click to enlarge)
Hide: This field will be added to the set, but it will not be displayed when you click the page metadata icon. Please be aware that as a consequence, users will not be able to edit this field.
Required: If you check required, this field has to be provided with a value. If the value is not pre-filled via bulk change, the page edit view will be expanded when first editing a page as long as a required field is still empty. The dialog can then only be exited via "Save" if all required fields have been provided with a value. This means neither changes to metadata nor the page itself can be saved as long as required fields are left empty. You are therefore strongly encouraged to mark fields as "required" only if users will be able to provide the necessary information.
![]() You can add the same metadata field to several sets. Internally it is only created once, which means its value is always the same for all sets.
You can add the same metadata field to several sets. Internally it is only created once, which means its value is always the same for all sets.
Add Metadata to one or more Pages
There are two conditions:
- First create a metadata set and add at least one field to it
- You have to be a Space Administrator
Once you have created a metadata set in the Space Administration and filled it with at least one field, the set (including the metadata fields you added to it) is available to be added to pages in the space. Adding metadata sets to a page will allow you to edit the contained metadata fields for this specific page.
There are three possible ways to add metadata to one or more pages: Via bulk change, via templates or visiting the page and adding it there.
Via Bulk Change
Bulk changes are an easy and fast way to add to or change space metadata on several pages at once. To make a bulk change, go to "Space Tools" > "Metadata" and click the tab "Bulk change".
Using the page tree at the bottom of the page, you can add metadata sets to single pages anywhere in the tree, or whole branches of the tree by clicking the top-level page of the branch.
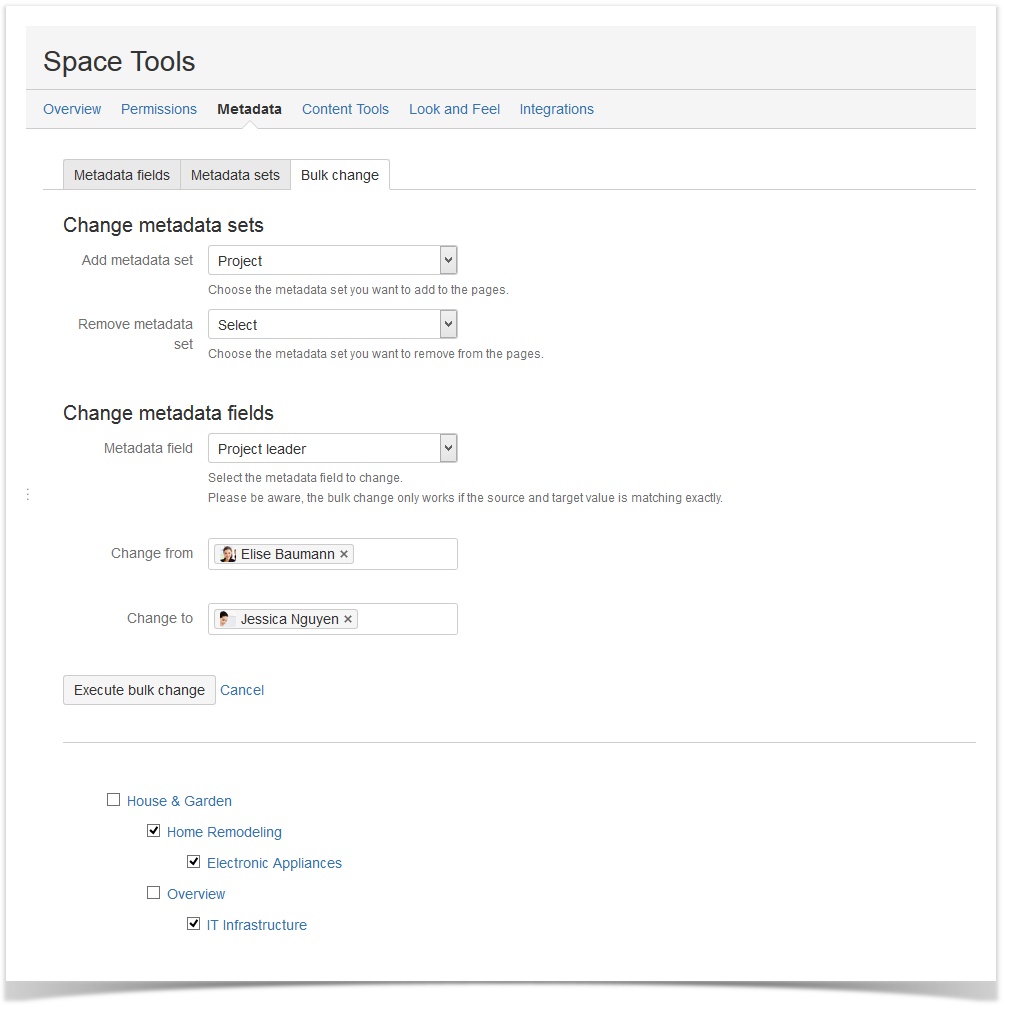 Image 10: Bulk Change (click to enlarge)
How to perform a bulk change:
- Select the page(s) you want to make changes to in the page tree at the bottom.
- Choose which metadata sets you want to add to the page(s)/remove from them and/or makes changes to in the dropdown menus.
- If you want to change values, enter the value that should be changed (e.g. the user name "Elise Baumann") and what it should be changed to (e.g. "Jessica Nguyen").
- Finally click "Execute bulk change" to apply the changes.
After clicking "Execute bulk change", a notification will pop up at the top of the page showing which changes have been made.
![]() When changing field values, empty is a valid value. If you leave the first field blank, changes will be made to all empty fields of the type you selected, not all fields. This also works for the field type single select (drop down), if you leave the initial setting "Select".
When changing field values, empty is a valid value. If you leave the first field blank, changes will be made to all empty fields of the type you selected, not all fields. This also works for the field type single select (drop down), if you leave the initial setting "Select".
You can only change global metadata as a Space Administrator, if you add global metadata fields to a space set first. Bulk Changes will not work for global metadata sets. Alternatively, use the Metadata Java API to implement a global bulk change.
Via Templates
As we have seen earlier, you can add metadata sets to page templates.
To add an already existing metadata set to a template
- Go into the Space Administration > Metadata > Metadata Sets.
- Click "Edit" for the correct metadata set.
- Choose the template in the dropdown next to "Template".
- Finally click "Add Template" and
- Save your changes.
If you check the box "Default Set" before saving your changes, the metadata set is automatically added to every newly created page.
Every time a new Confluence page is created using this template, the chosen metadata set will be automatically added to the freshly created page.
At the Page
Reminder: You have to be a Space Administrator to perform this action. Otherwise, the sidebar in edit mode and the metadata icon at the top of the page won't be visible.
Last but not least, you can add metadata directly to a page. Choose this option if you want to add metadata to only one page.
- Go to a page and click "Edit" on the top right.
- Expand the Metadata sidebar on the left by clicking the following symbol:

- Click "Configure Sets" at the bottom.
- Check the sets you want to add to the page.
You will now see the available metadata fields, which you can immediately edit.
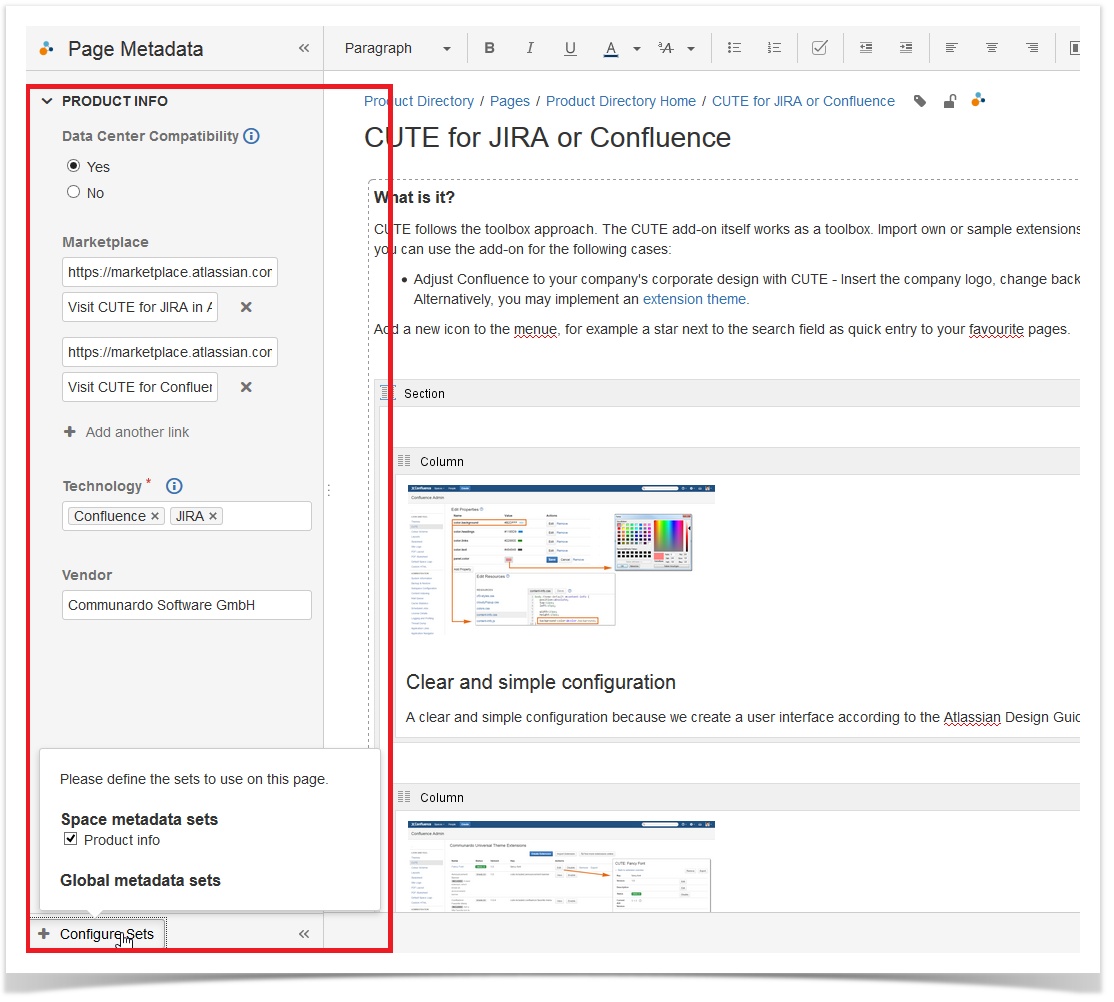 Image 11: Add Metadata Set and Configure Metadata Fields (click to enlarge)