Configure User Profile Elements (v 3.3)
- Enrico Schierz
- Yelyzaveta Burda
- Lorenzo Manfredini
Configuration Overview
You can access the configuration via the menu item Users & Security - User Profile Configuration in the panel on the left side of the administration console (choose cog icon > General configuration at the top right of the screen).
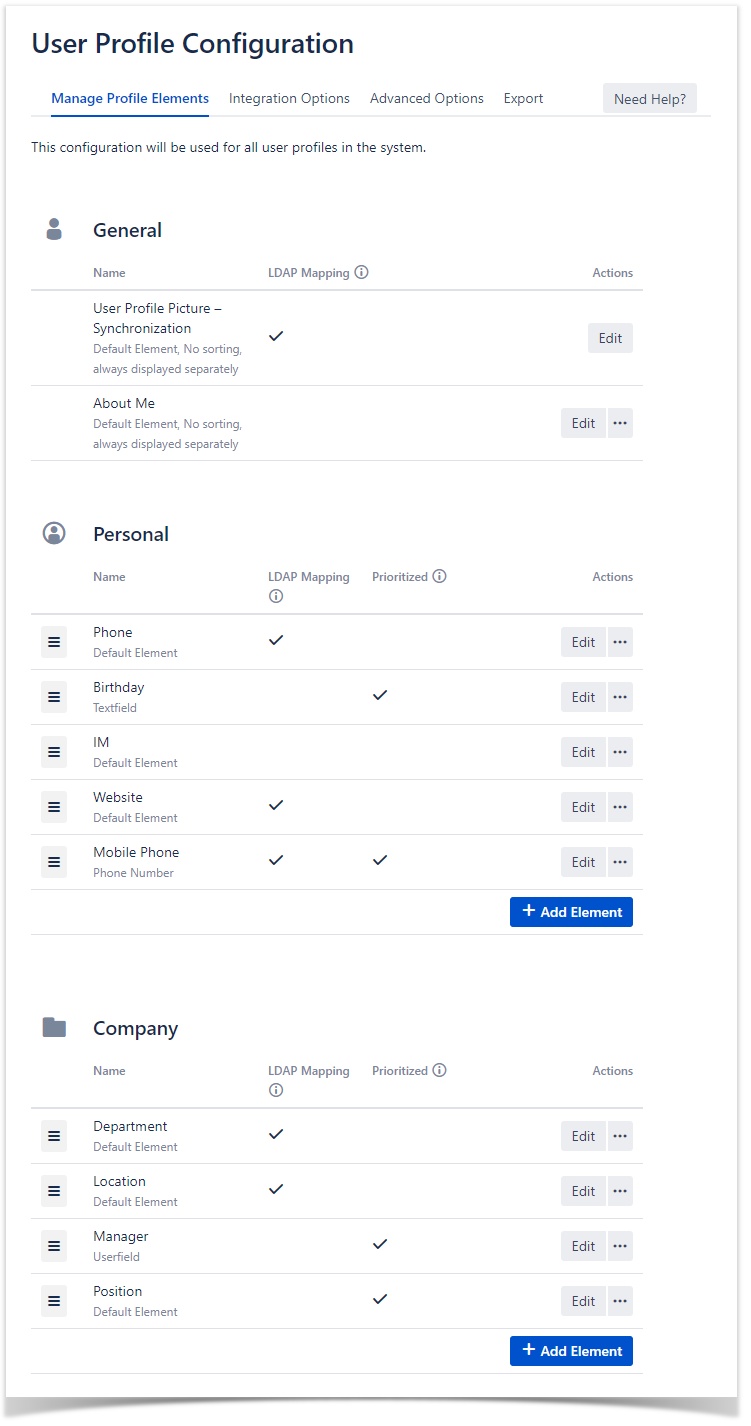
Image 1: Configuration – Profile Element Overview (click to enlarge)
The configuration page allows you to add new elements for user profiles or to edit existing elements. This includes standard elements of the user profiles.
The standard elements “Full Name” and “Email” cannot be manipulated in order to protect important system functionalities, therefore they are not available in the configuration.
Additional elements are placed in alphabetical order into the sections “Personal” and “Company” (hint: currently the division into sections is not shown in the user profiles).
You can change the order of the fields via drag and drop. If the order of the profile elements has been changed once, all new elements will be placed at the end of the list.
The section “General” contains the “About Me“ and you can configure the synchronization of user pictures in this section (Please find a more detailed description further down in the documentation.).
- You cannot change the order of the items in the “General” section, because “About Me“ is never displayed as part of the profile card and the profile picture has a fixed position within the profile.
- The configuration here will be used for all user profiles in the system.
SINCE VERSION 3.0
In the column "LDAP mapping" you can easily see if a profile element has an LDAP mapping. By hovering over the check mark you see the mapped LDAP field.
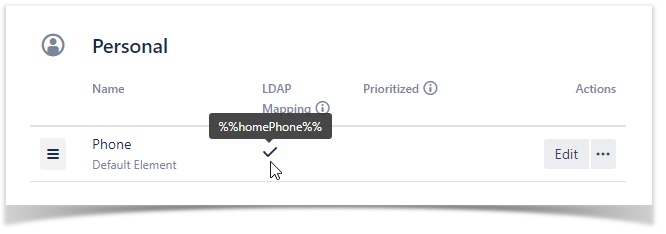
Image 2: Show LDAP mapping (click to enlarge)
The column "Prioritized" shows if a profile element is prioritized and will therefore be visible in the People Directory and in all User Profiles for Confluence macros where the "prioritized" mode is used.
Configuration of Elements – Add and Edit
In the "Actions" column click on the “Edit” or “Add Element” button to edit an existing item, or insert a new one.
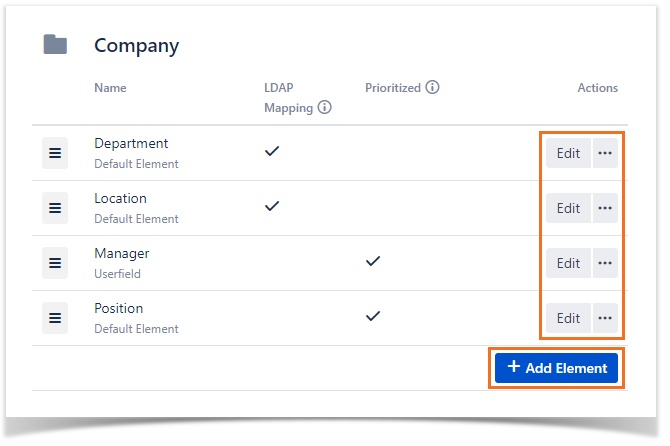
Image 3: Add and Edit Button (click to enlarge)
The configuration page of an element allows you to create/edit an element of the user profile.
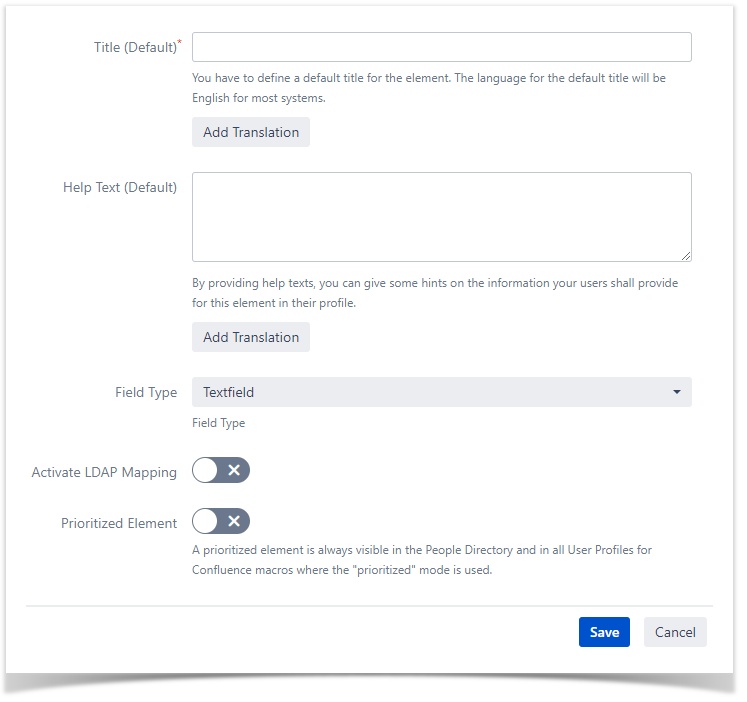
Image 4: Editing Profile Element (click to enlarge)
Title for this Element
- A default title (“Title (Default)” and “Title (German)”) for the element can be defined. The information for “Title (Default)” is mandatory. The Default and German Title can only be edited for additional profile elements and not for standard elements. To add a translation for the title click on "Add Translation".
Help Text for this Element
- Additionally, you can define help texts to support the users in filling out the element in their user profile. To add a translation of the help text click on "Add Translation".
Field Type Configuration
- The “Field Type” of the element determines the kind of element:
- Textfield: A simple text field (with wiki markup rendering)
- Textarea: This is convenient for elements which might carry longer texts (like the “About Me” element) since it renders wiki markup too.
- Userfield: Carry a single username and supports auto complete while editing a user profile. On the rendered page, you have the typical mouseover popup for this user profile.
- Textfield with Autocomplete: A text field to type in any text you want. Additionally, while editing it, the system will suggest values that other users have entered in this field before. User Profiles for Confluence suggests values that start with the same letter(s) that you already entered. Auto-completion is also available for several values, if they are separated by commas.
- Single Select (Radiobuttons): Allows the configuration of pre-defined options. The user can select their profile information from one of these options.
- Multiple Select (Checkboxes): Allows the configuration of pre-defined options. The user can select their profile information from more than one of these options.
- Phone Number (since version 2.1): A text field for inserting a phone number. This field type will be rendered as a link which provides a click-to-call feature.
- For the synchronization to work, you have to activate the toggle button "Activate LDAP mapping" to provide a mapping of LDAP attributes to standard or additional user profile elements. It is possible to relate more than one LDAP attribute to one user profile element. The mapping has to be provided at “Mapping for LDAP Attribute(s)” by using the following syntax:
- Any LDAP attribute has to be given as
%%LDAP_ATTRIBUTE%%(i.e. name of an LDAP attribute enclosed in two percent signs (%%)). - Multiple LDAP attributes with the same name are supported. If there are such attributes they will be mapped to the same profile field, separated by comma.
- You can also specify static text (e.g.
%%street%% %%number%% in %%city%%) - Use
%%upp_delete_value%%as a placeholder to delete the data for previously synchronized profile element.
- Any LDAP attribute has to be given as
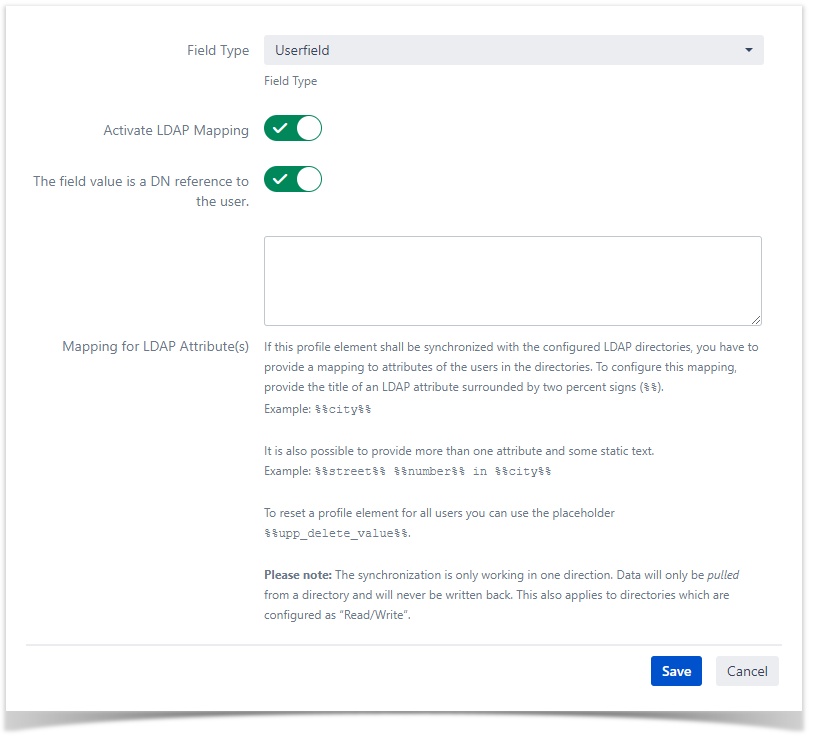
Image 5: LDAP Mapping (click to enlarge)
- Special feature for “User Field”. If this field type is selected, an additional toggle button “The field value is a DN reference to the user” appears. You can enable this toggle button to define that the user name in the user directory is a distinguished name.
Integration with Metadata Add-on
SINCE VERSION 2.1
Starting with version 2.1 user profile elements of type "Single Select (Radiobuttons)" and "Multiple Select (Checkboxes)" can be used as field types in the Metadata add-on. For details please refer to our knowledge base article.
Prioritized Element
SINCE VERSION 3.0
The toggle button “Prioritized Element” defines, if the element will be visible in user profiles, hover cards, profile lists or organization charts where the "prioritized" mode is used.
- For the profile macro and the hover card this will only work, if you have enabled the enhanced profile macros, as described in “Exchanging Profile Macros”.
- It is not possible for the “About Me” field.
- Elements of type "Phone Number" are always shown on profile cards, also if they are not prioritized. This includes the default profile element "Phone".
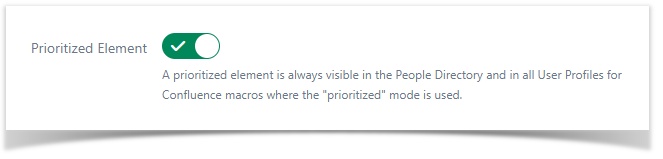
Image 6: Prioritized Element (click to enlarge)
Configuration of Elements – Hide and Delete
Click on the drop down menu and then on “Hide” (default elements) or “Delete” (additional elements) to hide an item, or delete it.
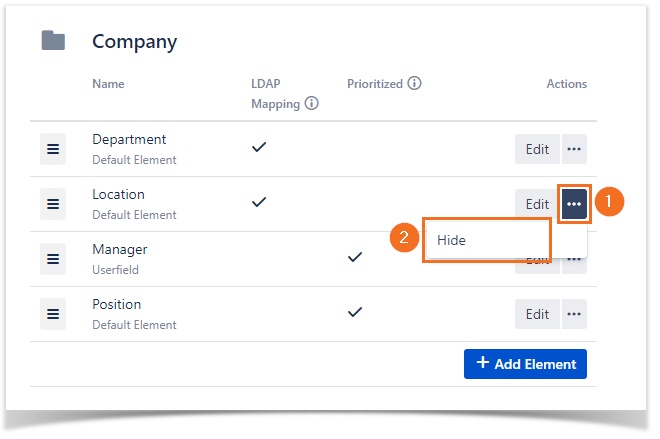
Image 7: Hide Profile Element (click to enlarge)
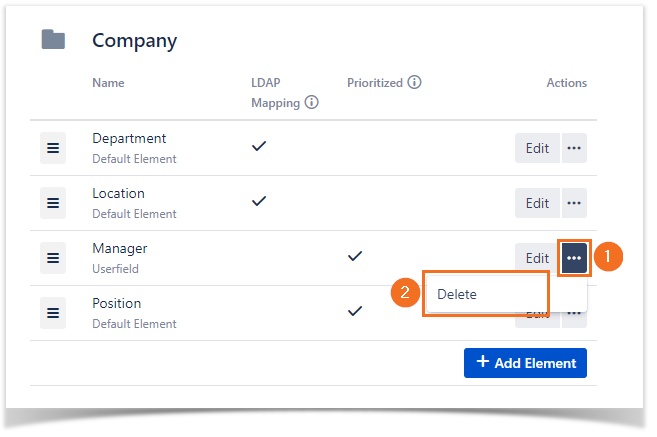
Image 8: Delete Profile Element (click to enlarge)
Existing additional profile elements can be deleted via “Delete”. Standard Elements can only be hidden via “Hide”.
- The value(s) for a hidden element stay stored as long as the element is hidden and are displayed again after clicking “Show”.
- When a previously added profile element is deleted, all the values belonging to this element are purged as well, for all users.
- Hiding standard profile elements only works, if the profile macro has been exchanged.
Additional Notes
- Users cannot edit synchronized profile elements. An element is considered “synchronized”, if the field “Mapping for LDAP Attribute(s)” in the customization form is not empty, even if the value of the mapped LDAP attribute is empty. This restriction only applies to users who are synchronized via LDAP. Local users can edit each profile element.
- Unknown LDAP attributes are recognized during synchronization and will be ignored. They are listed after each manual synchronization and produce a warning in the logs.
For the data of the user profiles to be updated, a synchronization has to run first. See the next section for instructions. - Though supported, it’s recommended not to create more than 15 to 20 additional user profile elements.
- Fields of the type “Textfield with Autocomplete”, “Single Select” and “Multiple Select” will not be synchronized.
- While editing a profile element, only some of the field types can be selected. For fields of some types it is not possible to change the type at all. This is because values stored for fields of a specific type cannot be migrated automatically to values for fields of every other type. E.g. values stored for fields of type “Multiple Select” are completely different from values stored for any other field and therefore, the type of these elements cannot be changed. The following modifications are possible:
- Textfield ↔ Textarea ↔ Textfield with Autocomplete ↔ Phone Number
- Userfield (no change possible)
- Checkbox (no change possible)
- Radiobutton (no change possible)
The synchronization of user pictures from a central storage is supported (since version 1.10). You can find the configuration under “General” in the settings of User Profiles for Confluence (Administration Console > General configuration > Users & Security - User Profile Configuration).
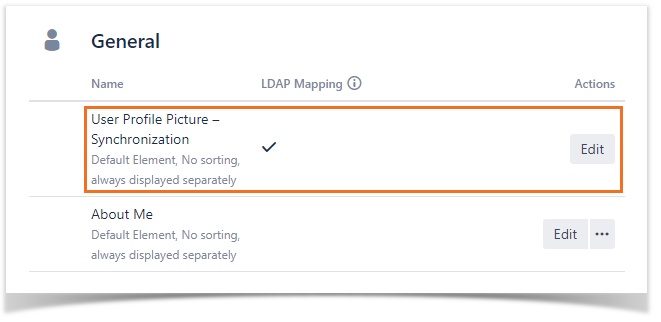
Image 9: Edit User Profile Picture Synchronization (click to enlarge)

Image 10: Configure User Profile Picture Synchronization (click to enlarge)
Synchronization of user pictures from a user directory
To synchronize user pictures from a central user directory, you have to enter the attribute name where the picture is stored. The name of the attribute is typically “thumbnailPhoto” for Active Directory and “jpegPhoto” for OpenLDAP. You may set multiple attributes separated by a comma, i.e. “thumbnailPhoto,jpegPhoto”. This is useful, if you have configured multiple directories of different types.
The synchronization is based on the following features
- While the synchronization process is running a picture of a user is read out, cropped to a square format and, if necessary, scaled down.
- Pictures are stored in size 96 x 96, if the original has a sufficient resolution. Otherwise the picture is stored in 48 x 48.
- If a picture is updated in the picture storage, the user picture will be overwritten in Confluence during the next synchronization.
- Users can upload their own pictures in Confluence, but after the next synchronization the picture from the picture storage is displayed again.
 If there is no picture defined for the user in the external storage, the user's uploaded image will be preserved beyond the synchronization task.
Stop Synchronization of User Pictures
Leave the field “Attribute Name” blank, if no synchronization is required or if you want to stop the synchronization.
Information about Performance
On systems with many users (1000+), the first synchronization may take very long (several hours) and can impact your system's performance. To improve the process or in case of synchronization errors, it is recommended to enable “Login Synchronization” for a couple of days.
All Versions
- Release (v 3.5)
- Release (v 3.4)
- Release (v 3.3)
- Release (v 3.2)
- Release (v 3.1)
- Release (v 3.0)
- Release (v 2.1)
- Release (v 2.0)
- Release (v 1.12)
- Release (v 1.11)
- Release (v 1.10)
- Release (v 1.9)
- Release (v 1.8)
- Release (v 1.7)
- Release (v 1.6)
- Release (v 1.5)
- Release (v 1.4)
- Release (v 1.3)
- Release (v 1.2)
- Release (v 1.1)
Disable checkingPremium suggestions